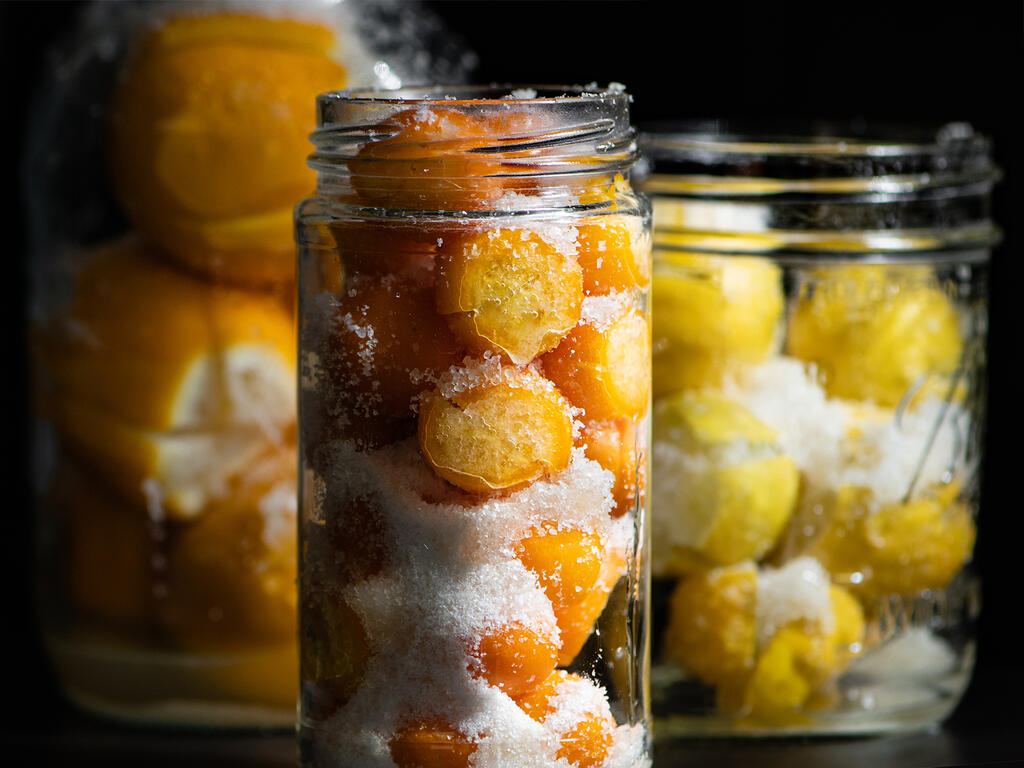
Preserved Lemons, Limes, and Kumquats
RECIPE UPDATED 4/14/23
Newsletter
Sign up at the bottom of this page for the free Chic Eats newsletter. It includes new recipes along with a grab bag of curated content that was interesting enough to share around the dinner table.
Larder Superstar
Lemon is one of my first considerations when a dish feels flat, sometimes even before salt (though the two often go hand in hand). As one of lemon's biggest fans, it's a wonder that this is the first time I tried to preserve them. This is especially true considering that cookbook after cookbook waxes poetic about the complex flavor and multitude of uses of said fruit. Another motivating factor was that preserved lemons and limes are essential to a number of North African and Mediterranean recipes on the to-make list. Preserved kumquats joined the party mainly because I enjoy having candied kumquats around and figured why not try a savory approach.
Even with vinegar, you can taste the vinegar, but salt and lemon seems like this secret ingredient that's there but you might not even be able to tell that it's there. - Chef Jeremy Fox
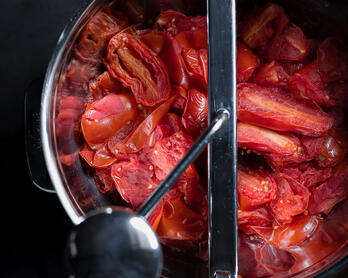
Preserved lemons are essentially pickled or brined fruit which makes them a powerful combination of salt and acid. As of today, the pictured jars have been hanging out in my refrigerator for two and a half months and each has an intense flavor and nose. The bright citrus notes are rounder and more concentrated so a relatively small amount of preserved lemon, lime, or kumquat can subtly permeate and enhance a dish. I've used them individually in hummus, salad dressing, guacamole, tomatillo hot sauce, jingalov hats, and more. Fresh lemons are still my main squeeze but now I have the ability to layer citrus which feels like a seasoning superpower.
The recipe below doesn't require special equipment and isn't much different from the one described by an Egyptian physician back in the 12th century (other than my fancy refrigerator). If you can boil water and slice fruit, you can make preserved citrus.

Around the Dinner Table
There are a couple of moments that stand out as having led me to prize lemon's transformative qualities. The first was a podcast episode (the name unfortunately forgotten) where a guest shared that they always mixed acids - i.e. they use both vinegar and lemon juice when a recipe calls for red wine vinegar. Lemon and vinegar compliment each other by playing a similar tune at different volumes. I'm now a full convert and always mix my acids when vinegar is called for, usually leaning on lemon more than vinegar. Mixing acids would qualify for my top 5 cooking life lessons.
The second "ah, yes" was an interview with Chef Jeremy Fox where he touched on his early days at Rustic Canyon Wine Bar. The owners, Josh and Zoe, had an acute sense when it came to acid and this encouraged Chef Fox to punch up the dishes. That's where lemon came in.
Josh and Zoe have a palate for a little higher acid than a lot of people...that was a big part of how I started seasoning my food and discovering how salt and lemon just make things taste more like themselves. Even with vinegar, you can taste the vinegar, but salt and lemon seems like this secret ingredient that's there but you might not even be able to tell that it's there. - Chef Jeremy Fox
I would not be able to count the number of memorable dishes I've enjoyed thanks to Chef Fox so if he says lemon is a key ingredient (and carrots are king), then that is the gospel.
This brings us back around to preserved lemons. The process is relatively easy - combine lemon, sugar, salt, lemon juice, and then turn things over to the alchemy of time. The payoff is bright citrus notes that are concentrated, rounder, and the texture can be torn with a gentle hand.
The recipe below is a mashup of Jeremy Fox's On Vegetables and Justin Smillie's Slow Fires though many formulas you find are similar.
Recipe Tips
Preservation is Personal
Some recipes leave the jars out at room temperature (60 to 70°F is suggested) for several weeks before refrigeration. The idea is to ferment the pickled fruit as part of the preservation process which adds a bit more funk or umami to the flavor profile. Other recipes refrigerate the jar(s) after a day or two.
I split the difference and leave the fruit out at room temperature for 7 to 10 days and then transfer it to the refrigerator for 4 to 8 weeks before using. There may still be some fermentation happening but it's very slow at such a low temperature. The recipe below can be used for either approach.
Is one method better than the other? I'm not sure but I do know that my preserved lemons, limes, and kumquats are delicious.
All The Things
Recipes often suggest discarding the lemon pulp and only using the preserved rind but with Meyer lemons, key limes, and kumquats I find myself wanting to use it all. Taste the pulp and rind to assess potency and then trust your palate.
Another option is to rinse then purée the entire fruit and keep it in the refrigerator to add on the fly. I'm not sure how long the purée lasts so I opt for small batches.
Fancy Fruit
As I understand it, either Meyer lemons or traditional/regular tart lemons can be preserved. Meyer lemons are a floral wonderland for the senses with an ideal thin (and less bitter) skin so I suggest using them if you have the opportunity. I use key limes for a similar reason but regular limes will work.
In terms of kumquats, there are different varieties with varying levels of sweetness and acidity - I used the Nagami.
Safety First
A brief summary of tips I found helpful which are expanded upon under instructions.
Sterilize the jars.UPDATE: I run my jars through the dishwasher but don't sterilize them beyond that anymore.Sterilize the citrus.UPDATE: The bacteria on your fruit is part of the glorious microbial process. You want to rinse the citrus thoroughly but I over-rotated on the boiling step when I first set out on my preservation journey.
Still essential...
- Make sure your salt/sugar/fruit ratios are correct.
- Keep the fruit submerged completely in the liquid -- this one is especially important. I tried some of the DIY methods and ultimately just bought the weights and they work well.
How Long?
I waited about 2 months to start using my fruit mainly because I was traveling and just didn't get a chance. Play around with things and see how the texture of the fruit feels (has it softened) or cut a small but of rind off, rinse it, and give a taste. The pleasure of slow food is that you can take your time and experiment at different stages.
What the pH
The pH of a liquid (potential of hydrogen) measures the level of acidity, a lower number being a higher acidity. You want the pH below 4.6 when preserving or fermenting since bad actors like botulism can't live in that kind of environment. This was my first try at preserving lemons so I decided to measure the pH. All three jars checked in between 2.4 to 2.6 which is well within a safe range. You don't need any special tools to preserve citrus, but if a Bill Nye the Science Guy vibe is your jam...
This device found its way into my holiday grab bag many years back so that's what I use (the linked product is a newer version). The less expensive option is pH strips though I've seem some canning articles suggest they're not accurate enough for food safety purposes.
Before You Go
One tip about using preserved citrus is that the flavor can be sneaky. I noticed with my tomatillo salsa and hummus that the citrus notes were more pronounced on day two. Keep that in mind when determining how much you want to add if you aren't eating the food on day one.

Limes at Polito Family Farms - Santa Monica Farmers Market
Farmers | Artisans
I make an effort to source my food from California artisans with a special focus on the Santa Monica Farmers Market. Below is a list of the folks who contributed to this dish.
- JJ's Lone Daughter Ranch // Meyer Lemons, Kumquats
- Mud Creek Ranch // Meyer Lemons, Key Limes
- Polito Family Farms // Meyer Lemons
- Apricot Lane Farms // Key Limes
Cookbooks Referenced
- On Vegetables // Chef Jeremy Fox
- Slow Fires // Chef Justin Smillie
- On Food And Cooking // Harold McGee
Tools
- Chef'n Manual Juicer
- Jars and Lids
- Weights - I tried a couple of the DIY methods for holding down my ferments and ultimetly just bought some weights. They work well, don't take on any odors, and are easy to use and clean.
Ingredients
Ratios
The salt quantity in preserved lemon recipes can vary widely depending on the regional cuisine or application. With that said, most of my reference recipes suggested 5-10%, some being even higher.
Below is my ratio/percentage breakdown that can be scaled up or down. You can make lemons, limes, or kumquats with this formula. Fruit sizes/quantities are too variable so I use weight.
- 450 grams fruit (limes, lemons, or kumquats) / 16 ounces | 100%
- 45 grams Diamond kosher salt / 1 3/5 ounces | 10%
- 25 grams cane sugar / 4/5 ounce | 5.5%
- Extra lemon or limes for juicing
- For preserved kumquats and lemons, I use lemon juice. For limes it's lime juice.
- Rough estimate: If you're preserving 5 lemons, you will need about 3 to 5 lemons to juice (so 8 to 10 total).
Instructions
Slice & Salt
- Whisk the salt and sugar together then set aside.
- Prepare the fruit for salting by cutting off the end and then partially quartering the fruit, stopping before you slice all the way through. You can see in the picture that the lemons are quartered but the bottom in still intact. Small kumquats may only need to be halved.
- Gently spread the fruit apart and heavily sprinkle the exposed flesh with some of the salt/sugar mixture. Add half of the fruit to the sterilized jar, gently pushing everything into place with the back of a spoon or other dull utensil. Add half of the remaining sugar/salt to the jar, then the remaining fruit, then top with the last of the salt/sugar. Squeeze enough juice into the jar to almost cover the citrus. Between being stuffed in the jar and the maceration process, the fruit will give off some liquid in the first several hours and that should make up the difference. As mentioned above, I use lemon juice when preserving lemons or kumquats, lime juice for limes.
- Close the jars with fresh lids and set aside for a couple of hours. Next, take the jars and turn them upside down, shaking things gently to mix up the salt, sugar, and juice. Open the jar and use a spoon or other dull utensil to press the fruit down again. At this point the fruit will just about drop below the brine line. Seal things back up and set aside for several hours.
- One more turn and jiggle of the jar then press the fruit down and seal it up. If the fruit still isn't totally submerged, add some more citrus juice. Leave the fruit in a low-light cool (65 to 70°F) area of the house.
Burp the Jar
- The next day, turn the jar over and give it one more gentle shake to make sure the salt/sugar is dissolved. Twist the lid open just enough so that any gas that may be building up is released. My last couple batches of preserved citrus were really active so I burped the jars a couple of times a day. That said, I've had batches that were pretty chill so don't fret if your jar only has a little bit of activity.
- Over the next several days, check on the jar each day to both release any gas and make sure the fruit hasn't popped up above the brine line. I refrigerate the preserved citrus around day 7 to 10.
- Most recipes suggest waiting about 4 weeks to use or until the rind has softened. My jars have been hanging out for about 2 1/2 months. The fruit has a slightly translucent appearance and I can pull apart the rind with a gentle hand.
- Preserved citrus can last for many months in the refrigerator.
Work With Your Jars
I recently started watching Pascal Baudar's webinar Fermented Hot Sauces & Spicy Pastes and one of his simple but excellent tips is that you have to work with your jars. This means that even after the fruit has settled in, you should periodically check on the contents. If it's a brine like this recipe, remove any seeds that have floated to the top and ensure that the fruit is below the liquid line. I allowed some seeds to go rogue in my jar of Meyer lemons and around the 6-month mark they grew mold. There were only a couple of preserved lemons left and I didn't trust the situation so, regretfully, the remaining contents went into the trash. That said, what's left of my preserved limes and kumquats are going strong so all is not lost.
Close The Gap
As you work through your preserved fruit, the air gap above the brine will start to grow. Transfer the contents to a smaller sterilized jar when appropriate. Reducing the air gap means less opportunity for molding or spoiling.
May the patience be with you.
Newsletter
Sign up at the bottom of this page for the free Chic Eats newsletter. It includes new recipes along with a grab bag of curated content that was interesting enough to share around the dinner table.

The annual hiking trip to Flagstaff and the Grand Canyon always entails a heated competition between the jars in my refrigerator to see what components will earn a spot in the cooler. 2024 saw vintage 2023 preserved limes sailing through to the winner’s circle. Originally posted here.