How to Make Naturally-leavened Sourdough Bread
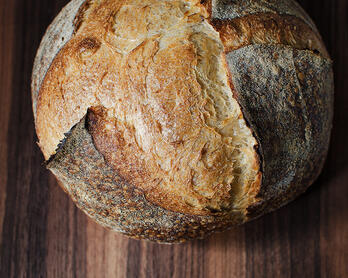
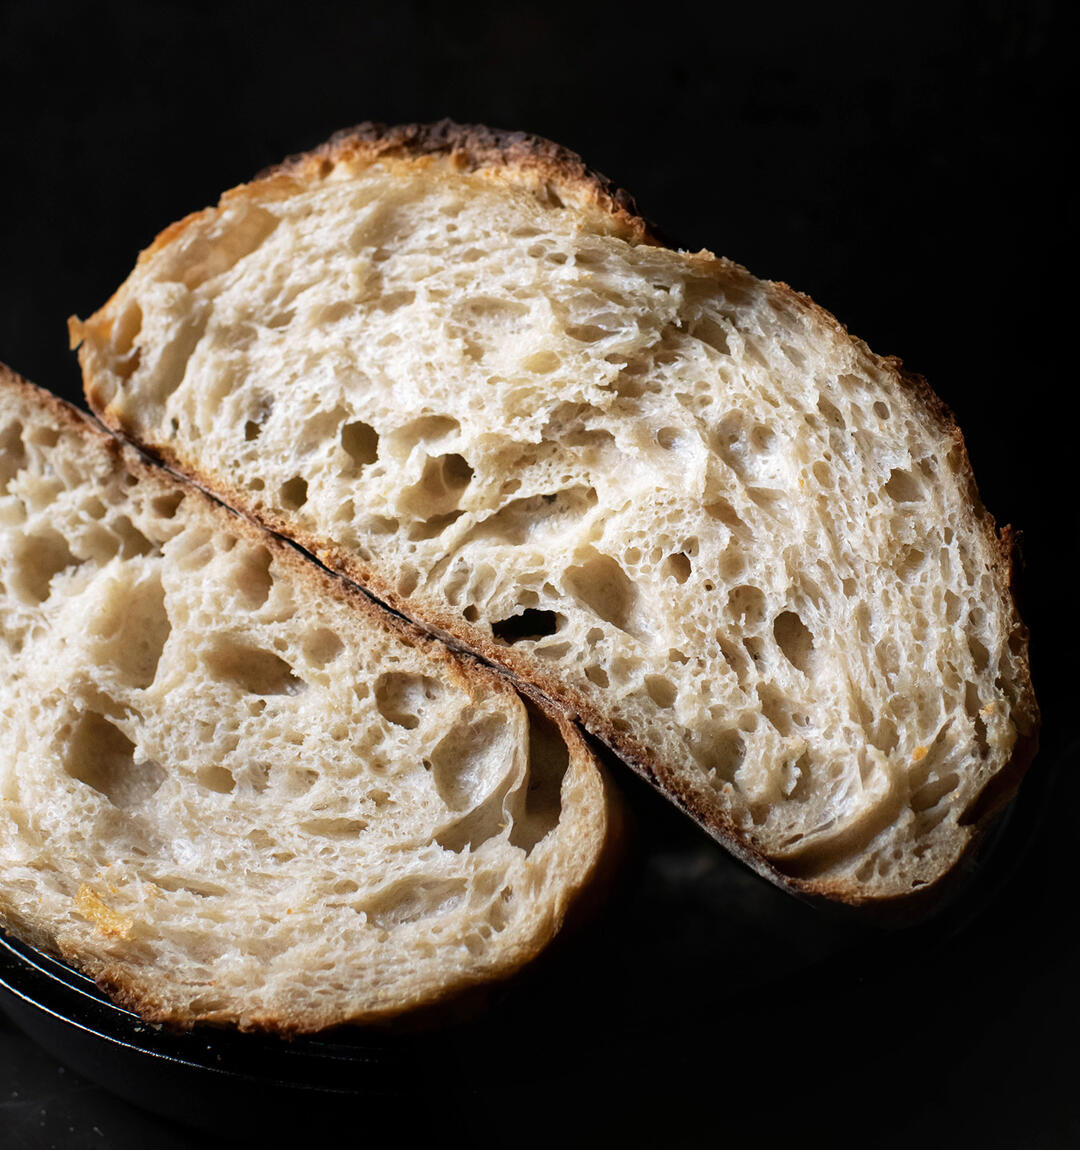
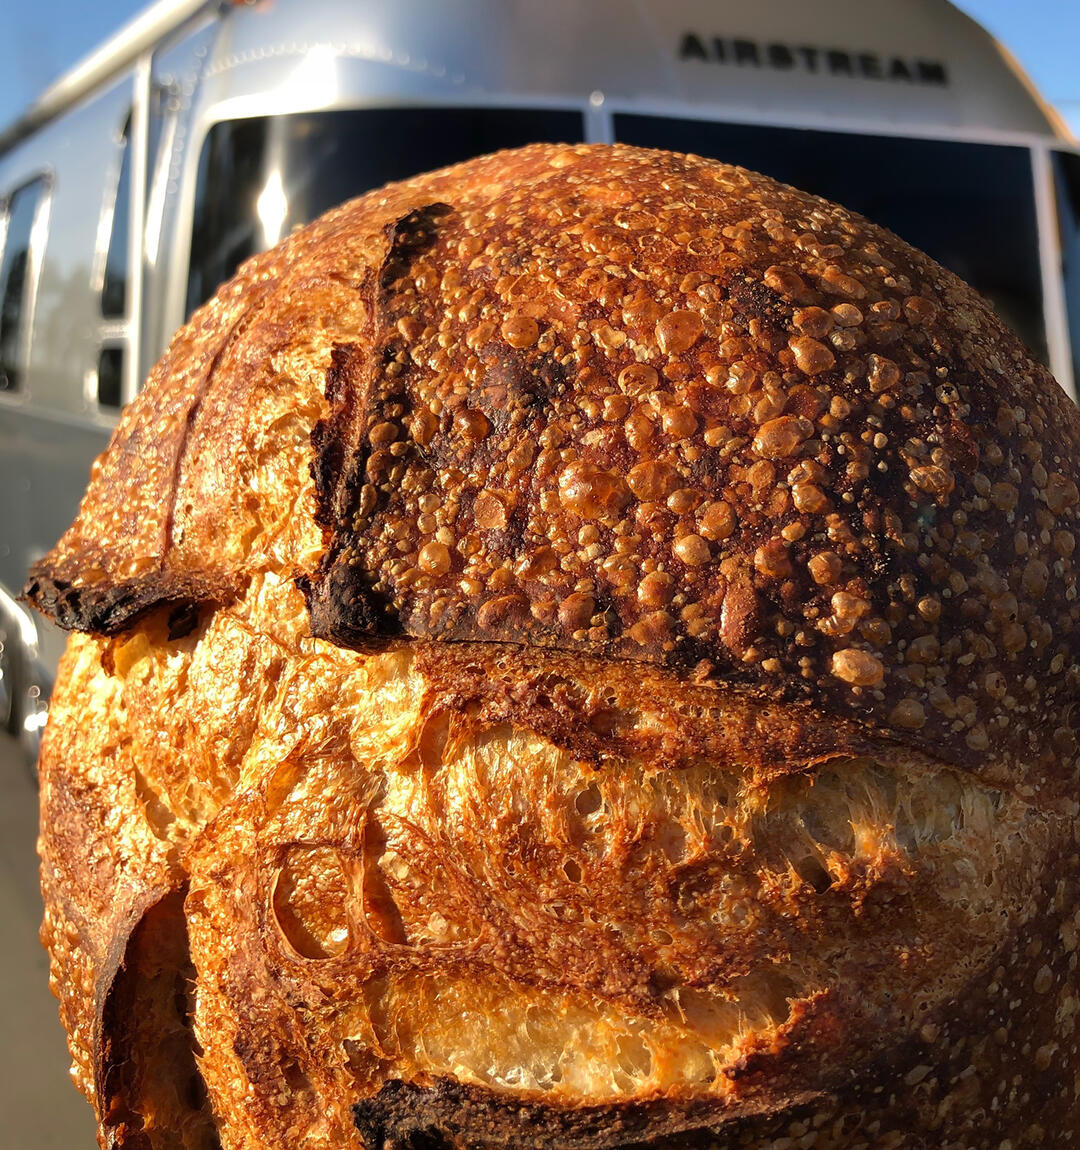
Loaf 149 - Central Milling Flour: 50% T85 / 30% ABC Malted / 20% High Mountain
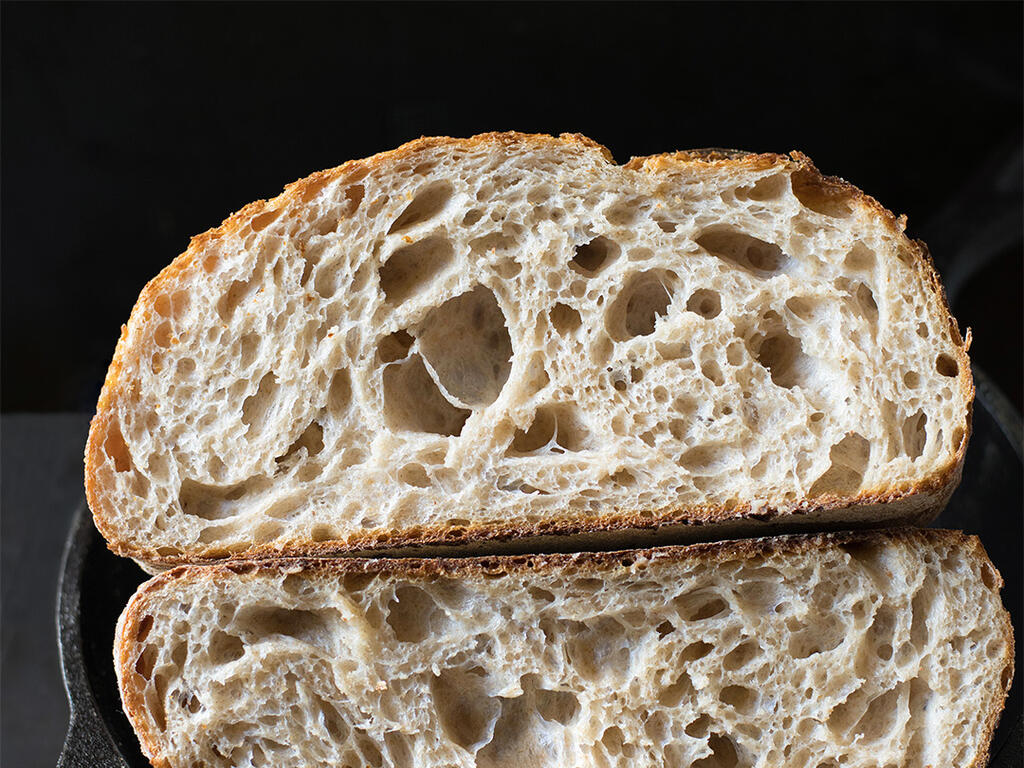
Photo Note: Each loaf of bread pictured was made using the basic process laid out in this post, sometimes with slight changes in timing and the % of leaven in the dough (1-2% for the latter). I've noted the various blends of flour under each image. I would pay money for any of this bread. That's not a pat on the back, it's a suggestion to have fun with the process because what you bake will almost certainly be enjoyable. The magic of making bread can, at times, feel like a superpower.
Sourdough in its purest form - flour, water, and salt - is remarkable in both its simplicity and complexity. Working these humble ingredients together with my hands and then pulling a mahogany beauty out of the oven continues to be one of the most fascinating and joyful cooking experiences I've ever had.
Now, it goes without saying (but I'll say it) that the following formula and set of instructions are not the "right" way to make a country sourdough loaf. This post is my approach based on techniques picked up through conversations with fellow bakers, bedtime cookbook reading, and repetition. Some steps or particular habits are what I like to do and you may choose a different approach with similar or even better results. I offer this information up for folks to enjoy and hopefully improve upon. It's also important to keep in mind that my environment (ambient temperature, humidity, etc.) and starter are different than yours and these factors play a role in how the final dough behaves.
With those qualifications out of the way, this sourdough bread recipe is specific enough that it will likely result in something delicious if you have a healthy starter. A vibrant starter, or natural leavening agent that helps your bread rise, is at the heart of any great slice of bread. My post on building and maintaining a sourdough starter is here with a secondary post on Dave Miller's Starter Maintenance here. The latter is great for people who bake infrequently or want long-term storage with less feedings.
Included below are a number of tips, video links, my note-taking spreadsheet (customize it as you wish), and detailed instructions. While sourdough bread and food science are an exciting duo, how the craft continues to evolve through community and knowledge sharing is what makes it special. Please feel free to leave a comment if you have additional questions, need clarifications, or have some wisdom of your own to share. Part of slow bread's appeal is learning from the bakers that embrace it.
Then we all held hands and sang around the campfire.

The Most Important Thing
I asked Dave Miller what the most important factor is for naturally-leavened bread. He said without hesitation, "The health and force of the leaven." As mentioned in the introduction, a vibrant sourdough starter is at the heart of every great slice of bread. My post on building a starter is here and below are additional thoughts on the matter.
Smell
My mother-in-law said to me one day, "Why do you smell everything? Always smelling things." It's true - spices, fruit, and especially my starter, I am always sticking my nose into my food's business.
It is essential to know your starter's smell. When feedings are consistent and you're turning out good bread, know what your food pet smells like throughout the process and pay attention when things seem off. I've missed feedings and as a result aborted bakes because Moomin the Starter smelled too acidic. An inconsistent nose may mean your feeding schedule needs to be adjusted. Is it hot in the house? Try feeding with a lower inoculation or refresh more frequently. Starters are incredibly resilient but for peak performance their microbial utopias need to be kept in balance. The key is to adjust for your environment.
"Unless you work in an environment that is consistent in both temperature and humidity throughout the year, expect that there will be seasonal swings in the needs of the bread." - Jeffrey Hamelman, Bread
Dough Temperature
Many bakers preach the importance of maintaining a specific dough temperature (DT) and I would like to offer two supporting reasons based on my experience.
- There are a myriad of factors that go into making naturally-leavened bread. Stabilizing the temperature helps create a more predictable timeline and narrows the factors that you may need to troubleshoot. This is helpful when learning how to make bread or trying to tweak the beautiful product you're already turning out. Tips for maintaining proper DT are included below.
- Yeast is simply happier at 75°F than 65°F and nobody wants a sad food pet.
Keeping Your Food Pet Happy
I live by the beach in Southern California so it's usually about 70-73°F in our house which is a touch lower than an ideal dough temperature (DT). For that reason, I use a few methods to maintain proper DT throughout the breadmaking process. Steps are listed below in the order that I use them. In case it's not clear, I don't generally use the following steps for feedings. When feeding the starter, I use room temperature water (70-73°F) and then place the bowl in a warm room. The DT of my starter is usually 74-75°F.
- 80°F Water - When making a loaf of bread, I use 80°F water and then place the bread dough in a warm area of the house. This does a relatively good job of maintaining the temperature depending on the time of year.
- Oven Light - If the weather is cool, I add 80°F water, place a dark towel over top, and then put the bread dough in the oven with the light on. How close or far from the light depends on how much temperature support I need. It won't take long for you to figure out the right position on the rack, but be cautious when first using this method as the dough can get quite warm.
- Water Bath - If the dough needs a boost or I'm in a hurry to bring it up to temperature, I fill a deep-sided skillet with warm water (about 90°F) and then place the glass bowl holding the dough directly into the pan. Once the dough is up to temperature, I take it out and use the oven light to keep things stable. I always use this method for my Naturally-leavened Pizza Dough.
I prefer to keep my bread dough at about 76-78°F. I've found the fermentation can run away from me if the DT is above 78°F for an extended period of time. If you live in a warmer climate, reducing the % of levain/leaven (inoculation) in your formula or using slightly cooler water can help control and slow the fermentation which will allow enough time for strength to develop. Balancing strength and fermentation is what the bread baker seeks.
When to Use Your Starter
Sometimes I feed the starter at 11:00 p.m. with a 10-15% inoculation, and then I mix the dough the next morning using the starter from the night before. This is similar to the Tartine Bread method. Other times, I feed at 11:00 p.m. with a 20% inoculation, then feed again in the morning with a 70% inoculation for an afternoon mix. I'm partial to the latter method because it produces a stronger dough but both approaches result in lovely bread. The recipe in this post incorporates a booster feeding but I encourage you to experiment and see what works best for your schedule and starter.
Stirred, Not Shaken
My sourdough likes to be stirred down once (sometimes twice) between feedings. When I have time to take this extra step, the nose is especially pleasing and activity more robust. I have a few theories as to the reason but can't commit to anything in writing, so my advice is to just give your starter a stir and show it you care. I stir roughly halfway through the feeding/doubling process. Maybe sing your food pet a song while you're at it.
Loaf 156: 26% Grist & Toll Hard White (Whole Grain) / 27% Central Milling High Mountain / 47% CM ABC Plus
Cookbooks
- Tartine Bread - I started my bread journey with Tartine Bread. Chad Robertson devotes over 30 pages to a single country loaf and that can feel overwhelming or exciting depending on how you see things. There are a number of bread recipes along with satisfying "back of the book" options like French Toast. I highly recommend both Tartine Bread and Tartine, the latter being more of a traditional baking book with tea cakes (more tea cakes) and scones. Tartine only seems to be available in kindle format now but it's a classic and I would want it any form. The updated Tartine Revisited is also an option. You can't go wrong with any of these books.
- Bread - You can flip this cookbook open to just about any page and learn an interesting nugget about sourdough. In addition to the wealth of knowledge, there are excellent naturally-leavened, hybrid (instant yeast and sourdough), and instant yeast recipes to try. I have spent many evenings absorbed by this book and find it beneficial to periodically reread sections as my skills progress.
- Bread Science - I've gifted this book to a couple of fellow bread nerds. It's manageable in size and educational with great little illustrations to boot. Emily Buehler's story and how she came to write the book can be found on The Sourdough Podcast.
Commit
My breakthrough came when I decided to commit to a basic country formula until I nailed the process. Though I often heard the siren call of olive and porridge breads, I wanted to develop my instincts before branching out. By instincts, I mean a oneness with the dough. Understanding the feel, stretch, visual cues, and smells can only be learned through repetition. After making the same country formula many times, the process started to feel second-nature so I began swapping different wheat in and out of the dough while being mindful of the cues I had learned. I can now consistently make a delicious-to-me loaf of country bread with varying types of whole grain and yet there's still so much to learn. The journey is the joy.
Be Curious
As mentioned above, my first country loaf came from Tartine Bread and then things evolved from there. Books, bread classes, The Google, and online baking communities have been an endless source of bread nerd information and inspiration. I recommend being as curious as is polite when in the presence of other bakers. I try to have at least one pressing question bookmarked in my brain in the event that I have the opportunity to pose it to another baker. My current question is: Aside from hydration, what is the biggest process change that you make for higher percentages of whole grain? If you have an answer to that question, I would love for you to leave it in the comments or send me a note.
Spreadsheets are Forever
I'm including my baking spreadsheet and feeding calculator. Anyone is welcome to use and customize it. If you plug in your leaven's doubling time, the rest of the schedule will fill itself in. I recommend reading the post before using the spreadsheet and if anything needs clarification, please don't hesitate to let me know.
After baking a loaf of bread, I duplicate the spreadsheet and rename the new tab for the next loaf. This allows me to build on previous observations and formulas. Between all of my tabs and my Instagram journal, it's easy to reference what I've done along the way to achieve different textures and flavors.
A word of caution with spreadsheets is that they can lull you into a paint-by-numbers state. Though I always document my bread, I make sure I'm listening to my dough and not just following the steps. Perhaps the dough is sluggish or more active than usual, or maybe your flour is strong and the dough is fighting you on fold 4. Listen to your dough and adjust accordingly.
Photos
I started the Little Brown Bakery instagram account as a journal to document my sourdough adventures and didn't expect anyone to care about it but me. The internet works in mysterious ways and the journal ultimately connected me with like-minded bread geeks. The upside of IG's bread community is the kindness and generosity with which people share information. The downside is that Instagram is owned by Facebook and edits what you see (and does it poorly) in addition to the data mining issues.
To that point, it's no problem if social media isn't your jam. Snapping a couple pictures of each loaf on your phone and putting them in a folder will work just as well. Over time, you'll notice that trends emerge as you scroll back through the images and evaluate them alongside the respective notes.
Bake in Someone Else's Kitchen
Taking your starter into a new environment and working with different tools forces you to pay closer attention. It's an away game, but you're a good team - you've got this.
When I visit my mother-in-law in Pennsylvania, a portion of my starter tags along on the trip so that I can make bread and Sourdough Pancakes per request. I've learned a lot from those experiences. For instance, I wondered why my Pennsylvania bakes always seem to have an especially shiny and blistered crust. It occurred to me that my MIL's oven runs hotter than mine and I tend to pre-heat the cast-iron longer at her house. Though one loaf almost burned, most have turned out to be stunners. Additionally, dough that didn't seem to be very active popped awake during the bake. I have since made it a point to pre-heat my home oven for a solid hour before baking the bread.
The other east coast lesson was 2X a day feedings. In Pennsylvania, I only have a short window to make bread so I feed the starter twice a day to help it acclimate. I connected some bread class/cookbook dots and realized that the starter was likely performing better with the extra refresh. Now 2x a day feedings are the norm.
Size Matters
This formula has a total dough weight of about 1kg which is roughly the same as the Tartine Bread recipe. It's not a huge loaf of bread, but it is bigger than many of the formulas you see popping up online.
Reducing the amount of dough you're working with can help if you're struggling with texture, shaping, or general handling. Simply take the formula below and make it a little smaller while maintaining the relative percentages. My experience with rolls and smaller loaves is that the overall structure is more forgiving and the crumb is on the wild side. Don't feel like you need to make a smaller loaf of bread though, this is just a tip to consider if needed.
I Heart Science, But...
This post is not heavy on science as it would have become unmanageably long. There is a lot of "how" and "why" but I don't take any deep dives into the microbiology.
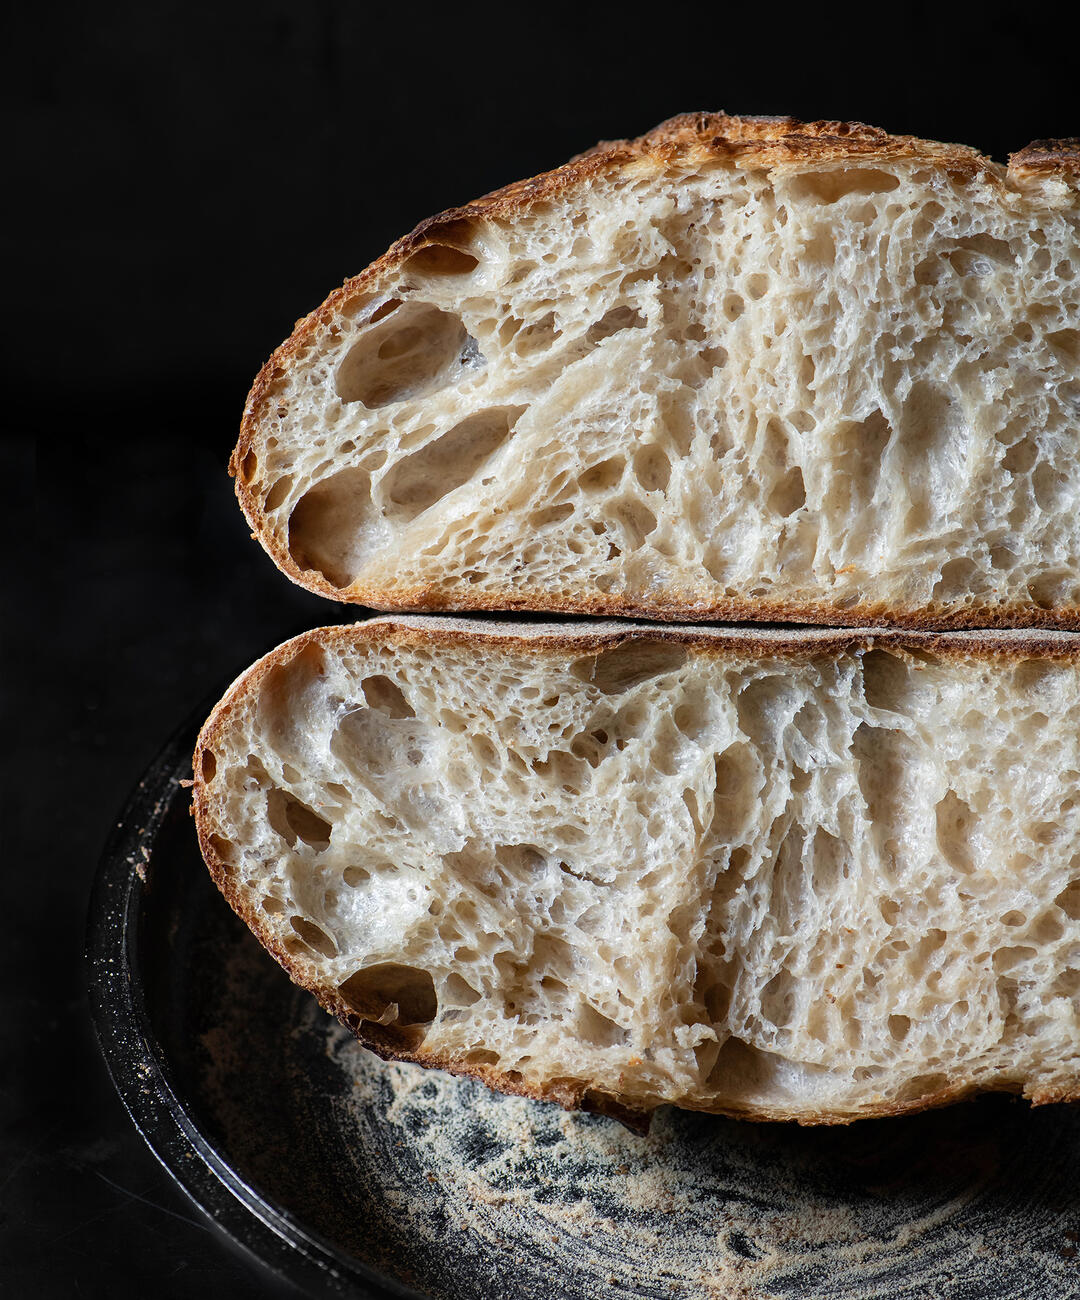
Loaf 200: 27% Camas Country Bread Blend (Whole Grain) / 28% Central Milling High Mountain / 45% CM ABC Plus
"It may seem odd to think in terms of tasting bread. Chew slowly and conscientiously. The tongue picks up salt, sour, sweet, and bitter...keep chewing...inhale and exhale. Did you enjoy a delicate nuttiness in the flavor? A suffusing sense of wheat and fermentation? And finally, is there a long and lingering finish? If we learn to taste with care and give consideration to what we are experiencing, our vocabulary of bread assessment will grow, and along with it our discernment." - Jeffrey Hamelman, Bread
Types of Flour
As can be seen in the photo descriptions, I've switched a variety of grains in and out of my country loaf so different types of flour will definitely work. Here's an overview of the flour I use.
White
The base of this recipe is a blend of ABC Plus and High Mountain from Central Milling in Sonoma. I have also used Keith Giusto's Artisan Malted Bread. If you don't want to order flour, more readily available bread flour like King Arthur or similar can be substituted. With that said, I would probably cut King Arthur bread flour with some all-purpose...maybe 25% AP/75% bread though I haven't tested this. Strong bread flour is good for structure but can create other issues like an overly chewy texture.
Whole Grain
All of these whole grains have been in my country sourdough bread at one time or another. Each has its own characteristics that change the dough's hydration and strength needs, but I wouldn't worry too much about those differences when using 20-30% whole wheat. With that said, it's worth making a note when there are changes in your dough. For example, if I use Grist & Toll Hard White instead of Red Fife, I drop a stretch/fold or two because the dough is so strong. The extra strengthening won't ruin my bread though, it's more a matter of dialing things in.
- Camas Country Mill - Bread Blend, Edison (home milled)
- Grist & Toll - Hard White, Sonora, Red Fife, Hard Red, and Charcoal (not actual charcoal - no longer available and I miss it)
- Kandarian Farms - Khorasan/Kamut (home milled)
Other
- Central Milling - T85, T70
Bread Baking Tools
- OXO Scale - There are two scales in my kitchen and the workhorse is my OXO. It's a sturdy cooking companion that repeatedly gets covered in flour, sauce, or whatever else is flying around the kitchen.
- Thermapen Digital Thermometer - An important tool for managing dough temperature (DT). I have three Thermapen digital thermometers that are distributed between my home, the Airstream, and my mother-in-law's house. They're fast, easy to clean, and the probe makes a perfect cake tester.
- Lodge Cast Iron Double Cooker - Relatively inexpensive pan that has brought endless sourdough bread joy into our life. The pan traps the steam inside during the first 20 minutes of baking (then you remove the lid) which helps develop a beautiful crust. Lodge's double cooker is also great for charring vegetables and cooking tortillas.
- Silicone Gloves - I have multiple pairs of these and they work well. Fabric gloves don't cut it with a 500°F pan.
- 9" Proofing Basket - Tartine Bread's country recipe (cut in half) is the model for my sourdough and a 9" basket works well for one shaped round of dough.
- Flour Sack Towels - I line the proofing basket with a removable potato flour towel instead of dusting the shaped dough with flour. To transfer the bread from the basket to the hot cast iron pan, I place an upside-down baking sheet firmly on top, turn the basket over, then remove the basket and gently peel off the towel. I can then use the baking sheet like a pizza peel and slide the shaped dough into the pan. Note that the dough that comes into contact with the baking sheet has been thoroughly dusted with a 50/50 mix of whole grain and white rice flour.
- Scoring Lame + Extra Blades - This is the only lame I've owned though there are several different kinds available. In a pinch I've used a single-edge razor.
- Dough/Bench Scraper - My right hand tool, or rather it often functions as my right hand. When making Flaky All-butter Pie Dough, the bench scraper is essential since it allows me to chop, scrape, and fold the dough with minimal contact between the butter and my warm hand. Also a necessary tool for shaping and cutting bread dough. I have a dough scraper from Sur la Table (ruler on two sides) and Norpro (ruler on one side - Amazon). Here is another option if those are out of stock.
- Plastic Bowl Scraper - Used primarily for scraping down the sides of the bowl after mixing or when transferring the dough to the work bench. The one I have came with a Central Milling order so the linked item is comparable (both are straight and trapezoidal). Perhaps a rounded side and a flat side would be more useful but I haven't bothered to research that. My free scraper has been doing a solid job for many years now.
- Large Glass Bowl - I've had the same set of nested glass bowls since college. The linked items aren't the same but a bowl is a bowl for these purposes. The glass allows you to see the bubbles forming along the bottom which helps gauge how far along the fermentation is.
Loaf 188: 30% Home-milled Camas Country Edison / 10% Central Milling High Mountain / 26% CM T70 / 34% CM ABC Plus
Instructions Jump Links
Flavor
This bread has a nice bit of acidity which I enjoy. If you want a "cleaner" flavor, try playing around with the fermentation time. Perhaps increase the leaven % (to maybe 18 or 19) and shorten the cold fermentation. The original Tartine Bread recipe is 20% leaven and 10-12 hours in the refrigerator. You could also use my formula with a slightly higher DT to speed up the fermentation. The longer the yeast luxuriates, the more "sour" the bread will be. If the bread becomes too acidic, it can break down the structure so that's also something to keep in mind.
Ingredients - Overview/Total Amounts
Levain/Leaven Build
- Mature sourdough starter
- 60 grams Grist & Toll Sonora (or whole wheat of choice)
- 60 grams Central Milling Organic Beehive (or unbleached all-purpose)
- Filtered water
Note: I perform relatively small feedings to minimize waste. If you're worried about this, portion off some mature starter and put it in the refrigerator (loosely covered) as an insurance policy. I've never had an issue with this process but my environment is pretty mild - not too hot or cold. It's always a good idea to be cautious when trying a new routine.
Dough
- 225 grams Central Milling ABC Plus|| 45%
- 140 grams Central Milling High Mountain || 28%
- 135 grams whole grain of choice (See Flour Types) || 27%
- 395 grams filtered water || 79% Note: Only 395 grams of water is specified but an additional 5-10 grams is ultimately added because you will dip your hands in water several times. The final hydration is closer to 80-81%.
- 80 grams mature levain/leaven || 16%
- 10 grams of fine sea salt (10.2 if your scale rounds to .01) || 2%
Other
- 1 tablespoon of rice flour (for dusting)
Percentage Calculations
- Flour: 225g + 140g + 135g = 500 grams which is 100%
- Water: 395g = 79% of 500
- Levain/Leaven: 80g = 16% of 500
- Salt: 10g = 2% of 500
Starter Creation and Maintenance
My post "How to Build and Maintain a Sourdough Starter" covers this topic. You should have a healthy starter that is being fed twice a day, preferably at the same time of day. If you feed once every 24 hours and your starter is vibrant, give it a go. I used to feed once a day and still turned out lovely bread. A secondary post on Dave Miller's Starter Maintenance can be found here and is great for people who bake infrequently or want long-term storage with less feedings.
Day 1 - Levain/Leaven Build
Note: I don't maintain my starter at 100% hydration so these ratios will be different if 1:1 is what you're used to. The mixture is a little "stiffer" meaning there is more flour than water added during each feeding. Also, the mixture should smell like fresh flour after the feeding. If the nose is acidic even after the refresh, consider lowering the inoculation (i.e. increase the fresh flour and water relative to the mature starter). Hot weather, missed feedings, or other environmental conditions can cause this to happen.
11:00 a.m. - Feeding (Sometimes performed in the afternoon depending on my schedule so there's flexibility.)
Combine the following ingredients, mix thoroughly, and place in a warm area (preferably 73-76°F). I stir the mixture down about halfway through the feeding/doubling process.
- 20 grams mature starter || 50% inoculation
- 34 grams room temperature (70-74°F) filtered water || 85% hydration
- 20 grams Grist & Toll Sonora (or whole wheat of choice)
- 20 grams Central Milling Organic Beehive (or unbleached all-purpose)
11:00 p.m. - Feeding
Combine the following ingredients, mix thoroughly, and place in a warm area (preferably 73-76°F). If I remember, I stir the mixture once more before going to sleep.
- 20 grams mature starter || 20% inoculation
- 85 grams room temperature (70-74°F) filtered water || 85% hydration
- 60 grams Grist & Toll Sonora (or whole wheat of choice)
- 40 grams Central Milling Organic Beehive (or unbleached all-purpose)

Loaf 188: 30% Home-milled Camas Country Edison / 10% Central Milling High Mountain / 26% CM T70 / 34% CM ABC Plus
Day 2 - Booster Feeding, Mix, Salt
10:30 a.m. - Booster Feeding
Note: If the nose is acidic even after adding the fresh flour, consider lowering the inoculation (i.e. increase the fresh flour and water relative to the mature starter). As mentioned earlier, hot weather, missed feedings, or other environmental conditions can cause this to happen. A lower inoculation will delay mixing the dough because the leaven will take longer to mature.
Combine the following ingredients, mix thoroughly, and place in a warm area (preferably 73-76°F). I stir the mixture down about halfway through the feeding/doubling process.
- 50 grams mature starter || 50% inoculation
- 50 grams Grist & Toll Sonora (or whole wheat of choice)
- 50 grams Central Milling Organic Beehive (or unbleached all-purpose)
- 85 grams room temperature (70-74°F) filtered water || 85% hydration
2:30-2:40 p.m. - Autolyse Mix
- Grab two medium/large bowls (glass or transparent if possible), set one aside.
- Add the 500 grams of dough flour (225 grams Beehive/all-purpose, 140 grams High Mountain, 135 grams whole grain of choice) to one of the bowls and thoroughly whisk.
- Warm 350 grams of filtered water to 80°F then add it to the flour. Note: Don't accidentally add all 395 grams of water in this step. The remaining 45 grams will be added in a later step.
- With a spoon (soup spoon works well) stir the mixture, scooping around the edge and bottom then pressing the mixture onto itself. Do this several times. It will look quite dry.
- When you've accomplished all you can with the spoon, use one hand to squeeze and mix until the dry bits are incorporated. Flip and press the dough several times to ensure there isn't any flour on the bottom. Note: The dough will seem stiff and require a little bit of work to incorporate - that's fine. The autolyse as well as the addition of leaven and more water (next step) will loosen things up.
- Take your frankenhand and rub it around the side of the bowl to pick up any dough that's sticking. Use the spoon or dough scraper to clean your hand off and return any bits to the bowl.
- Measure the dough temperature, make a note (my customizable spreadsheet is here), then cover with plastic or a shower cap, a dish towel, and place in a warm location (ideally 75-78°F). See Keeping Your Food Pet Happy.
- About 5-10 minutes should have elapsed. Set a timer for 1 hour.
Good to Know
- Autolyse is a process that aids in hydration and strengthening. The leaven and salt are not generally included, it's just flour and water.
- Even though there isn't any yeast included in this step, the DT is important for the strength development mentioned above.
3:30-3:40 p.m. - Leaven Prep/Addition
Note: Smell your starter. What do you notice? Make a mental note. My starter smells a touch fruity and sweet but then when I stir it there's a little more acidity on the nose. A happy starter is delightful (delightful being relative).
- Uncover the bowl with the dough.
- In a different small bowl, combine 45 grams of 80°F filtered water with 80 grams mature leaven. Note: Unless you already have some sourdough starter going in a separate bowl, the discard will be the seed to keep feeding.
- Stir and mash it around until mostly dissolved/dispersed. There will still be little blobs of leaven and that's fine.
- Scrape the leaven mixture onto the dough.
- With one hand, mix, squeeze, and flip the dough until the leaven is thoroughly incorporated. This will take a couple of minutes and it will be clear when the mass comes together and the consistency/texture is homogeneous.
- Dip the Thermapen in a bowl of water (prevents sticking) and measure the dough temperature. Make a note.
- Cover the bowl and place in a warm location (ideally 75-78°F).
- About 10 minutes should have elapsed. Set a timer for 40 minutes.
Good to Know
- Your food pet gets to settle in and party like it's 1999 for 40 minutes and then the parents - salt - will come home.
4:20-4:25 p.m. - Salt + "Pizza Stretch"
Note: Only dampen your fingers as much as is needed to prevent the dough from sticking. You don't want to incorporate excess water. Also, I try to keep the top the top and the bottom the bottom. I'm not sure if this matters but I've always done it out of habit.
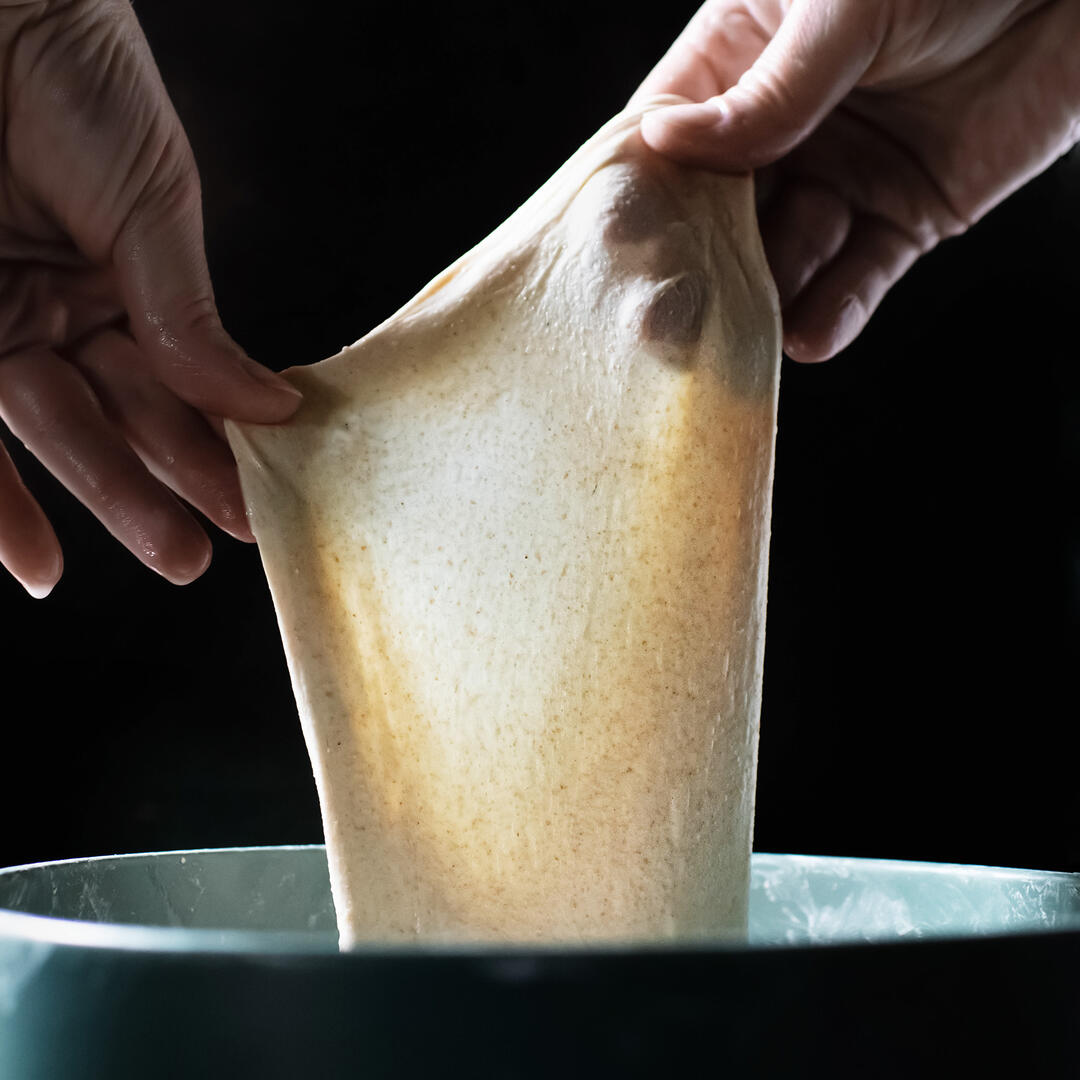
As you work through the next few steps, keep an eye out for bubbles here and there. The idea is to frequently observe the dough so that you can better understand your leaven's fermentation process. Also, you will notice how extensible the dough is on the first stretch/fold. A very different feel from the previous mixing steps.
- Measure the salt twice. It's a small amount and I occasionally notice discrepancies between measurements.
- Set a bowl of warm filtered water nearby.
- Sprinkle approximately 1/6 of the salt over the top of the dough. Dip the fingers of one hand into the water (shake off any excess) and pat the salt-covered dough, then work your damp fingers under one side of the dough (let's say the north) and pull it out and then back over the top. This is a stretch/fold.
- Sprinkle another bit of salt over the top, pat with damp fingers, then work your damp fingers under a different side of the dough (let's say the east) and pull it out and then back over the top.
- Repeat the sprinkle and pat process with the west and south sides of the dough, dipping your fingers in water as needed (shaking off any excess). If a little salt is left over, flip the dough and sprinkle it on the bottom then pat with damp fingers and flip the dough over again.
- Pat the dough all over with damp fingers - you shouldn't feel much if any salt.
- Next is what I like to call the pizza stretch. Continuing with lightly damp hands, pick the dough up (keeping the "top" facing your body) and rotate the mass, letting gravity stretch the dough. It should not stick to your hands or tear. This can get a little unruly so stretch as far as you can, probably 10-12" (I sometimes stretch further but it's tricky to handle.) Note: If the dough is too slack to work with, give it a second gentle stretch/fold (south, east, west, north) prior to the pizza stretch. That will tighten it up.
- Fold the dough onto itself towards your body in a south, east, west, north pattern (or whatever order you prefer). Place it in the bowl seam-side down. Note: If you find this midair folding method to be difficult, spritz a little water on your workbench and you can perform the pizza stretch/folding there. I do it this way when adding salt to my Naturally-leavened Pizza Dough though it's olive oil instead of water.
- Measure the dough temperature. Make a note.
- Flip the dough back over so it's seam-side up.
- Cover the bowl and place in a warm location (ideally 75-78°F). Set a timer for 30 minutes.
Good to Know
- Salt helps to strengthen the gluten structure and inhibit fermentation. It sounds counterintuitive to want the fermentation to be slowed, but great bread is a balance. If the yeast had its way, the dough would run out of energy before it had enough structure to give you that lovely spring in the oven. You will notice how much stronger the dough is in the next step.
Strengthen
Strengthening in shorter intervals up front allows for gentler handling later in the process. I've experimented with different strengthening techniques (slap/fold, coil, etc.) but find myself coming back to the classic stretch and fold with an added "pizza stretch" here and there. If you find your particular flour combination feels too strong or is fighting you by the 5th stretch/fold, drop a stretch/fold or two and spread the strengthening out for the next bake.
4:55-5:00 p.m. - Stretch/Fold + "Pizza Stretch"
Note: Observe the dough. How does it look? A couple of bubbles on top, some activity? As you perform the next stretch/fold, you'll notice that the dough is much stronger than the previous step.
- Work damp fingers under one side of the dough (let's say the south) and pull it out and then back over the top. The dough will resist you much more than it did when adding the salt. Don't force the dough, just stretch it as far as you can without tearing.
- Work your fingers under a different side of the dough (let's say the east) and pull it out and then back over the top. Repeat with the west and north sides of the dough, dipping your fingers in water as needed and shaking off any excess.
- Continuing with lightly damp hands, pick the dough up (keeping the "top" facing your body) and rotate the mass, letting gravity stretch the dough. It should not stick or tear. The dough is stronger at this point so I only stretch it about 8-10 inches across.
- Fold the dough onto itself towards your body in a south, east, west, north pattern (or whatever order you prefer). Place it in the bowl seam-side down.
- Dip the Thermapen in a bowl of water (prevents sticking) and measure the dough temperature. Make a note.
- Flip the dough back over so it's seam-side up. I like to tighten the dough ball by gently stretching the edges of the dough over itself. It's not a stretch/fold, I'm just closing the seam.
- Cover the bowl and place in a warm location (ideally 75-78°F). Set a timer for 30 minutes.
5:30-5:33 p.m. - Stretch/Fold
- Measure the dough temperature. Make a note. The target DT is still 76-78°F.
- With damp fingers, perform an east, west, south, north stretch/fold. The dough is strengthening nicely at this point so you don't need to stretch it very far.
- Cover the bowl and place in a warm location (ideally 75-78°F). Set a timer for 40 minutes.
6:13-6:16 p.m. - Stretch/Fold
Note: The dough will be noticeably puffier with bubbles on the surface. At this stage, the dough has decent strength so you can be gentle with the stretch/folds. The goal is to just give it a little shape.
- Measure the dough temperature. Make a note.
- With damp fingers, gently perform an east, west, south, north stretch/fold. These stretches will be quite small compared to when you were adding the salt.
- Cover the bowl and place in a warm location (ideally 75-78°F). Set a timer for 40 minutes.
6:56-6:58 p.m. - Stretch/Fold
- Grab the second glass bowl and set it nearby.
- Measure the dough temperature. Make a note.
- With damp fingers, perform a gentle east, west, south, north stretch/fold.
- Place the dough seam-side up in the clean bowl.
- Cover the bowl and place in a warm location (ideally 75-78°F). Set a timer for 1 hour and 20 minutes.

Loaf 99: 30% Central Milling T85 / 15% Grist & Toll Spelt / 55% Giusto's Artisan Malted Bread
Pre-shape/Shape
8:20 p.m. - Pre-shape
- Pick up the bowl and look at the bottom. You should see a layer of fermentation bubbles on the bottom along with bubbles on top of the dough. There will also be some jiggle in the dough's wiggle when you gently shake the bowl.
- Barely dampen the workbench and scraper - a spritz of water will do. Professional bakers sometimes have a container of water nearby that they occasionally dip the scraper into to prevent sticking.
- Work damp fingers around the edge of the dough to ensure it isn't sticking, then tilt the bowl and let the dough fall out on to the counter, scraping/encouraging anything that tries to stick to the bowl. The dough will naturally turn over so that the top becomes the bottom (for the most part).
- Using brisk but gentle motions, sweep and scooch the dough several times with the damp dough scraper until there is some tension. Examples can be found here and here. You don't want to deflate or tear the dough but it should be nicely rounded. This can take some getting used to so don't worry if you work the dough more than intended. Your healthy starter will help the dough bounce back. Also, I didn't start using the wet pre-shape until later in my baking journey. If you're just starting out, another option is to maintain a dry counter and then very lightly dust it with flour. You will also lightly dust your hands and scraper. The idea is for the dough to stick slightly to the counter and create tension. Only a small amount of flour is needed to aid in the handling.
- Once pre-shaped, the dough will likely have small bubbles all over the surface.
- Set a timer for 30 minutes.
Note: If you get to the end of 30 minutes and the dough has melted around the edge and isn't maintaining any structure, give it another pre-shape. I have only had to do this a couple of times when I was experimenting and things went off the rails. I don't expect you will run into this issue with the above formula/steps but felt it was worth mentioning.
8:30 p.m. - Boule Shaping
Many bakers, myself included, have obsessed about shaping at some point during their sourdough journey. The truth is, if your country loaf is properly developed and made with a vibrant leaven, you can botch the pre-shape/shaping and still bake beautiful bread. Loaf 200 was pre-shaped within an inch of its life. I'm not sure where things went wrong, but the dough was dragging and tore (maybe too much water on the counter), so then I did some more pre-shaping to work the blemishes back into the dough and smooth out the top. Poor thing was deflated. I was distracted by my error and don't recall how I ultimately shaped the dough. With all of that, the bread bounced back and was beautiful with a light crumb. Sure, it would have been even more lovely had I not ladyhandled things at the end, but that's beside the point. Loaf 200 was just about perfect and yet the pre-shape/shaping was highly imperfect.
For a basic country loaf like the one in this post, you can take some artistic liberties with how you shape. These videos here, here, and here aren't exactly how I shape but they would work. High-level tips include:
- Speed is not essential, but a brisk light touch is helpful. Try not to grab your dough with force.
- Don't use excess flour when dusting your hands, the dough, or the counter. You shouldn't need more than a little here and there if this dough is properly fermented.
Basic Shaping
- If you performed wet pre-shaping, make sure your dough scraper is completely dry. Same goes for the workbench surrounding the dough.
- Grab your proofing basket and line it with a flour sack towel so that it drapes over the sides. Do not flour the towel.
- Dust the top of the dough with whatever white flour you're using. In my case, it's Central Milling's ABC Plus.
- Gently brush off the excess (do this with a hand that doesn't have rings, if possible), then use the dough scraper to kick away most of the excess around the edge.
- Gently run the dough scraper around the edge of the dough to loosen it. The little bit of remaining flour should aid in this process. In one motion, sweep under the dough and flip it over. The dough will now be sitting on its floured "top" and the tacky unfloured bottom will be exposed.
- Rub your hands with flour (to prevent sticking) and then stretch the dough out very slightly into a rough circle.
- With both hands, gently wiggle your fingers under the dough that's closest to your body (the south) leaving your thumbs above the dough. Note: If there is any sticking, dust your fingers with flour and try again. That little bit of flour on your hands should take care of any sticking points.
- Gently take hold of this south portion of dough and stretch it towards your body and then up over the top of the dough. I like to stretch it just past the halfway point. The dough should stick to itself without issue, but take a finger and lightly pat down along the rainbow-shaped edge that you just created.
- Next, take hold of the right side of the dough and stretch it out then back over the top. Lightly pat down the connection point you just created on the left side of the dough. You can see an example here. Do the same for the left side of the dough - stretch out and over then lightly pat the connection point.
The above steps are pretty standard when you watch breadmaking videos. The next steps are where you see bakers impart their own personal style. My approach is relatively run-of-the-mill.
- With both hands, gently wiggle your fingers under the dough that's furthest from your body (the north and final portion) leaving your thumbs above the dough. Gently stretch it out and then back over the top. I do this the same way that I handled the south end of the dough, stretching a bit beyond the halfway point.
- If the dough is slack, I may add 2-3 "stitches" but often I don't. You can see one style of stitching here.
- Starting at the side closest to your body, take both hands and gently roll the dough onto itself and away from you until the top is the top again. As you roll your dough, your hands will eventually meet the counter on the other side. From there, use the dough scraper to gently pull the dough towards you, allowing it to grab the counter and create a bit of tension. Some bakers use their hands but I find the scraper is easier.
- The dough will be oblong, so give it one additional scooch from right to left and then use a few mini scooches to tuck in the corners. This will tighten things up into a beautiful round shape.
- Let the dough rest on the counter for a minute so the seam can close. I sometimes leave it on the scraper which makes the dough easier to pick up.
- Scoop the dough up and turn it over as you place it in the lined basket. The floured-top will now be on the bottom.
- If the seam isn't closed, there's no harm in lightly pinching it together. That is going to be the bottom of the loaf.
- Cover the basket with a shower cap or similar and let rest for 20 minutes then refrigerate. If my dough is particularly active, I skip the rest and go right into the refrigerator.
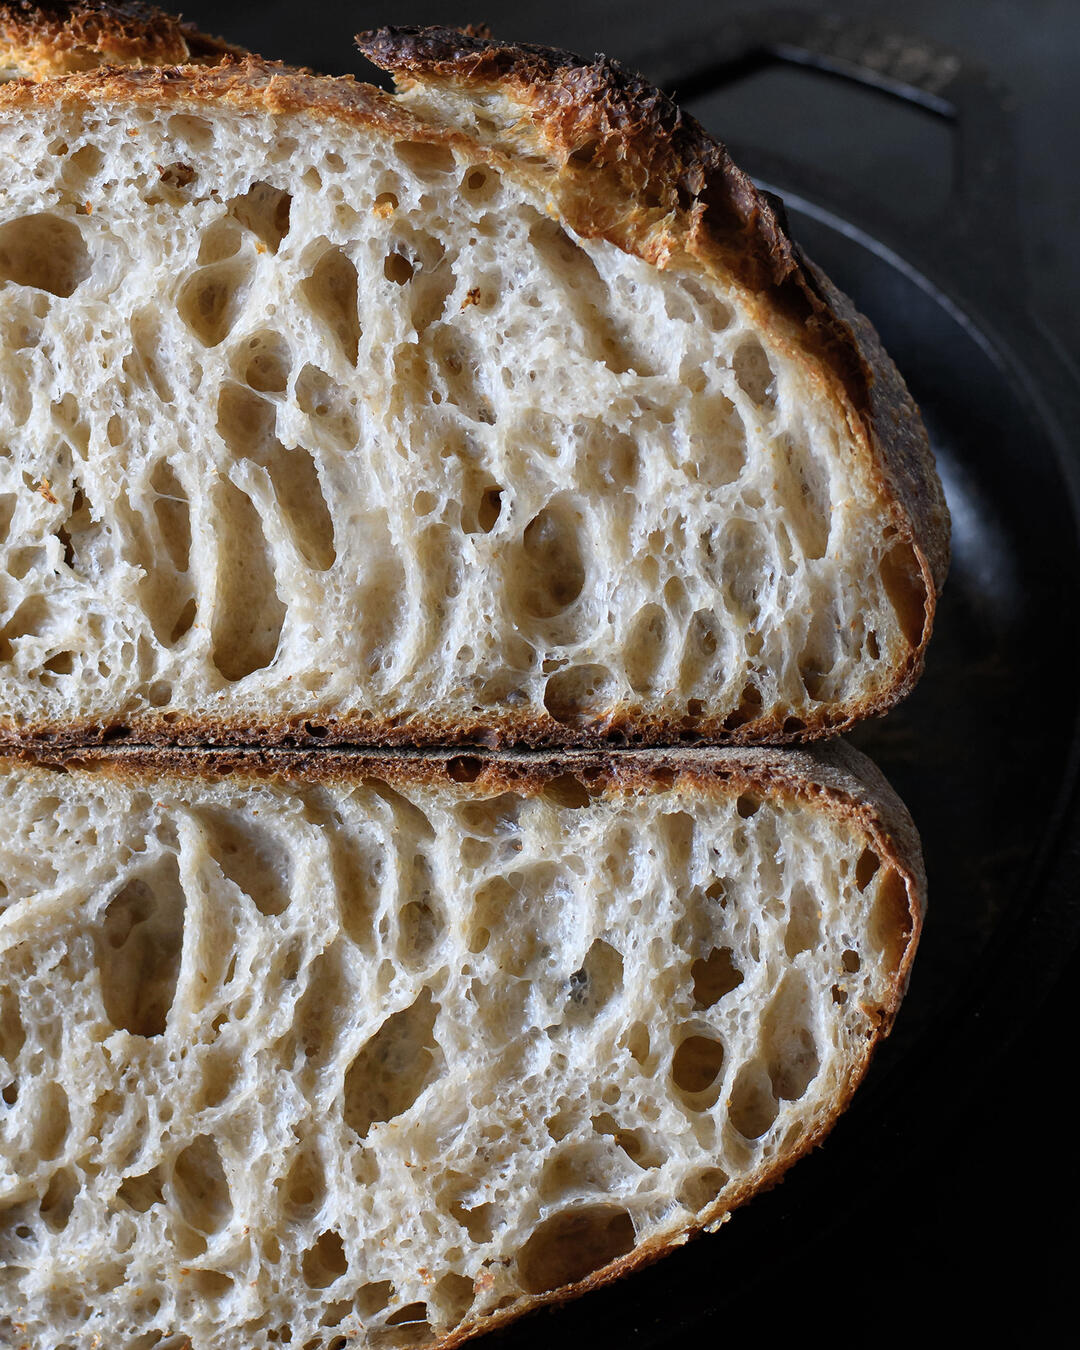
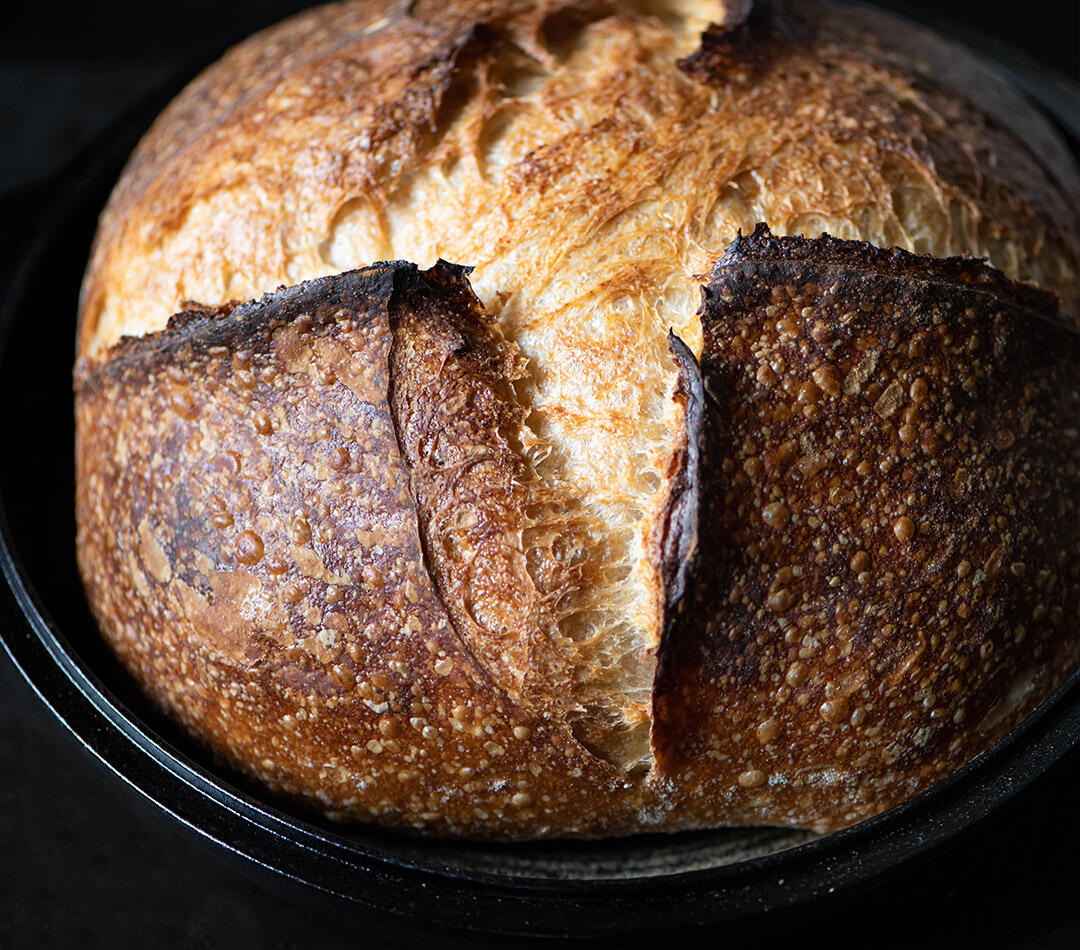
Loaf 155: 26% Grist & Toll Hard White (Whole Grain) / 27% Central Milling High Mountain / 47% CM ABC Plus
Day 3 - Bake
11:40 a.m. - Pre-heat
- Move your oven rack to the middle position or one notch below depending on the size (the Lodge double cooker needs to fit), and heat to 500°F. Turn the oven on about an hour before you want to bake.
12:30 p.m. - Dough + Workbench Prep
- 10 minutes before you are ready to put the bread in the oven, take the proofing basket out of the refrigerator, remove the shower cap/cover and set it on the counter. How does it look? How much did it rise? Take a damp finger and gently touch the dough. Get to know what it looks and feels like before and after you bake so you can start to associate the level of fermentation and readiness with the results.
- Set your lame near the proofing basket and silicone gloves near the oven. Note: If you even graze the pan when it comes out of the oven, it will leave a nasty burn. Always be very cautious. At the time of publishing, I was healing from an unfortunate encounter with the pan.
- Clear a space on top of your stove for the hot pan to sit on.
- Combine 1 tablespoon of your whole grain flour with 1 tablespoon of rice flour and stir to combine.
- Set a baking sheet near the proofing basket.
12:40 p.m. - Bake (Lid On)
Note: Scoring or cutting the top of the bread before it goes into the oven is a matter of personal preference. The goal is to give the dough room to expand. I am not particular about this step. I usually go with a large "X" - each arm of the "X" extending most of the way across the dough, or sometimes a Tartine box without the extra "+" inside the box. Watch some videos and decide what you like. I don't use a decorative/pretty scoring pattern for this bread.
- Put on a silicone glove and remove the smaller side of the lodge pan and place it on the stove.
- Generously sprinkle the top of the dough with the rice flour mixture. Make sure to coat all the way to the edge and don't worry if some of it gets on the basket liner. You don't want the dough to stick to the baking sheet. I use almost all of the dusting flour for full coverage since much of it will brush off after the bake. Note: I use my hand in lieu of dusting with a sifter or mesh strainer. For whatever reason, I find the latter method encourages more of the flour to stick.
- Invert the baking sheet and place it on top of the basket so that the basket is a couple of inches from the end.
- Firmly holding the baking sheet and basket together, gently but decisively turn the pan and basket over and then set the baking sheet on the counter.
- Remove the basket and gently peel away the liner, set aside.
- Hold the razor on an angle and score the bread and then slide it into the hot pan being careful not to touch the pan. Note: If the dough drags during scoring, very lightly rest a few fingers on the dough to stabilize wherever you plan to cut - this will create a little bit of tension and help the razor do its job.
- Promptly slide the dough into the hot pan. I use my left hand to gently guide the bread sometimes, taking care to stay away from the pan.
- Wearing your silicone gloves, place the pan in the oven, securely cover with the larger pan, and turn the handle to either the 3 o'clock or 9 o'clock position.
- Lower the temperature to 450°F and set a timer for 23 minutes and another timer for 50 minutes.
Patiently wait and pay attention to the smell. As you get to know your bread, you will also get to know how it smells when it's nearing the desired finish point. This dough bakes in 45-50 minutes in my oven but less time in my mother-in-law's oven. See Bake in Someone Elses Kitchen.
1:03 p.m. - Bake (Lid Off)
- After the first timer expires, put on a silicone glove and remove the larger top pan and place it on the stove. This is the first of two favorite moments that tell me how the bread is going to turn out. Enjoy the sight of your beautiful bread for a moment and then rotate the smaller pan 180° so the handle is opposite where it started (3 o'clock or 9 o'clock). Continue baking.
- After about 15 more minutes, it's worth checking on the bread. Look at the backside and make sure it's not getting too dark. I occasionally rotate the pan again. The edges of the "ear" may ultimately look a little charred but that's ok. Bake it out strong as they say.
1:30 p.m. - Cool
- When the crust is a deep golden brown to mahogany (about 45-50 minutes) put on a silicone glove and remove the pan from the oven. Using a metal spatula or similar, transfer the bread to a cooling rack. This is my second favorite moment, more so than cutting the bread open. When the bread is light in hand it's a good bake. The aesthetic of the crumb doesn't matter, the lightness tells me the crumb will have a fantastic texture.
- Immediately after you remove the bread, dust the bottom of the loaf. While wearing my silicone gloves, I support the bread on its side with one hand and then rub the bottom with the other glove. This easily kicks off all of the excess flour and makes a nice mess. There are other ways to accomplish this, but the gloves are handy and they get cleaned after every bake so there you go. Some people have fancy brushes.
- When the bread is cool enough to handle, pick the bread up and feel the weight with your bare hands. This is unnecessary but it's a milestone and opportunity to really feel how evenly the weight is distributed, how light it is and to give it a good smell. It's pure bread joy.
- Listen to your bread crackle and sing and then wait at least 2 hours to cut it (1 1/2 hours if you absolutely must, but the longer it rests the better).
Newsletter
Subscribe at the bottom of this page for the Chic Eats roundup. It includes new and updated recipes along with a grab bag of unique content that was interesting enough to share around the dinner table.
Loaf 179 & The Silver Lining at Sunset: 26% Grist & Toll Hard White (Whole Grain) / 34% Central Milling T70 / 40% CM ABC Plus